Friday, March 28, 2008

A new knitting project

I'm a bit behind posting this but I finished the second Irish Hiking Wrist Warmer on 5/23/08 and have been wearing them ever since. It started to get warm here and then yesterday morning, it snowed again. Most of it was gone by noon but has stayed cold since and the "warehouse" where my cube is stays a bit chilly.

After work today, I stopped by the Unraveled Sheep yarn store in Sandy. My sister Jessica asked if she'd failed in her mission and Verla (the owner) asked what that mission was. "To keep me out of here!" I told her. Of course, she then showed me the new sock yarn that had just come in and I was so tempted but I was looking for yarn to make the Spirogyra Fingerless Gloves by Lynne Vogel. I ended up selecting some Noro Silk Garden Lite, colorway 2029 which is variegated with green, pink, purple, and orange. It is wonderfully soft and is made up of 45% silk, 45% kid mohair, and 10% lamb's wool. Verla showed me a purse made with this yarn that had been put through a wash cycle. It had softened up even more with barely any shrinkage.

I also showed Verla my finished wrist warmers and she said I was doing great for a beginning knitter.

The photo below shows my start on the Spirogyra gloves after the first six rows of ribbing. Next row starts the actual pattern. A pretty good start for a second knitting project!


I'll post more photos as I progress.

Spirogyra pattern at Knittyspin: Spring 2008 - free pattern
Spirogyra page at Ravelry

Shorah Y'all!

Friday, March 21, 2008

Weave-It Purse

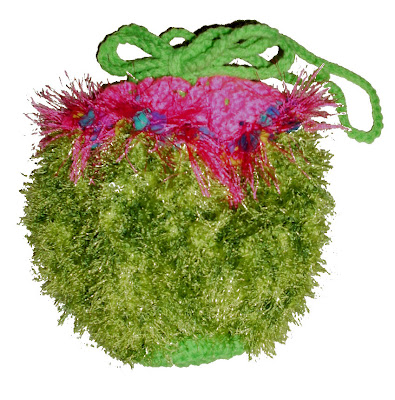
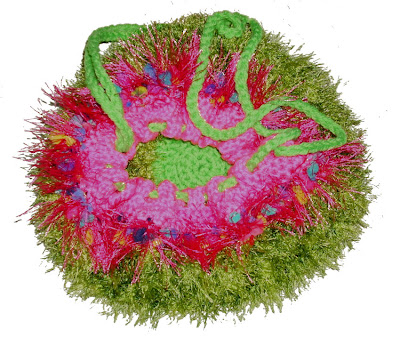
I was going to put this purse pattern up at Ravelry as a PDF file, but since it is so simple, I decided to just post it here and link to it at Ravelry. I originally made the purse for a 2005 fiber arts class at the University of Houston - Clear Lake and it makes a fun purse for a little girl, or, when made with less garish colors, could even be a sweet party purse.

This little purse uses squares woven on a Weave-It Loom along with crocheted straps. Weave-It looms can be found on eBay and at flea markets or antique stores, but newer versions of this type of loom can be found at Buxton Brook Looms and Hazel Rose Looms. You can also crochet or knit 3.5” squares instead. Different weaving patterns can be found in several books and downloads. You’ll find links to these sites at the end of the instructions.


Supplies:

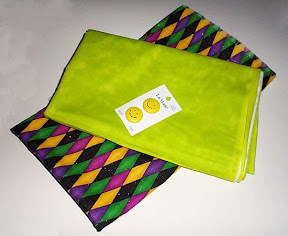
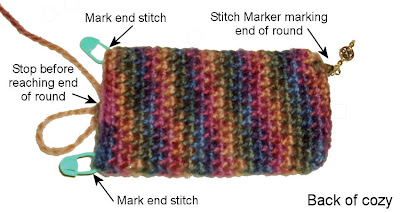
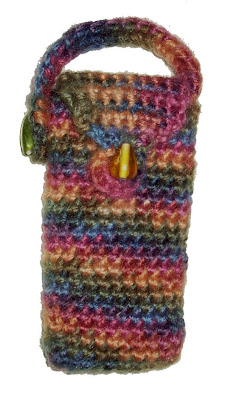
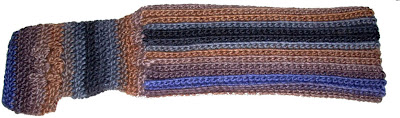
Loom: Weave-It, Weavette, or Hazel Rose 4” square loom and weaving needle
Yarn: Sample uses Red Heart Kids Solid: Navy, Lime, Orange, Pink, and Yellow
Button: 1” button to match yarn used
Fabric: Approx. ¼ yard matching fabric for lining
Crochet Hook: I/9 or size to match selected yarn

Body:

Weave 2 plain weave squares each of the lime, orange, pink, and yellow yarns.

Weave 1 patterned square of the navy yarn. (See the eLoomaNation site for some patterns.)

Note: If you use a thinner yarn, you may need to double up when warping the loom and weaving, otherwise the holes will be too large.

For front of purse, use the navy yarn to whip stitch four squares together, one each of the lime, orange, pink, and yellow. Repeat for back of purse.

Place the navy square in the center of the purse front and sew it to the front using the navy yarn.

Place the front and back together, wrong sides together. Use the navy yarn and stitch three of the sides together, leaving one side open. Note on the sample that I used a very simple in and out stitch over two threads. It doesn't have to be perfect either.


Strap:

With navy yarn, attach with sc to the front right corner loop of the front piece. Sc in each of the next 4 loops at the top of the woven square. *Ch 3, turn, 1 dc in each dc across.* Repeat from * to * until strap is as long as needed. Sample strap is 20" long. When strap is long enough, attach with sc to the left corner of the back of the purse (see photo below).


Closure:

Closure is made separately then sewn to the back of the purse.

Ch 10, turn, ch 2, hdc in each ch across, turn, ch 2, hdc in each ch across, turn, ch 1, sc in each hdc across. When you reach the end, ch 1, sc in end of first row of hdcs, ch 10, sc in end of next hdc row, fasten off.

Place finished closure at back of purse, on the outside, centering it over the top two squares. Use the navy yarn to attach it securely to the back.

Button:

Fold the closure over to the front of the purse and mark where the button will go using a straight pin. Attach the button at the marked location.

Lining:

Measure the purse width and height and add 1" to each measurement, for example, purse is 7" sq + 1" = 8". Cut two squares of the lining fabric using the measurement just taken. With wrong sides together, sew three sides together using a 1/2" seam. On the open end, fold down the edge 1/2" with the raw edge on the wrong side. Turn the pocket right side out and put inside the purse. Line up the top folded edge of the lining with the top of the purse, making sure the folded edge is below the loops of the woven squares. Sew the top of the lining to the purse top edge. It can be hand sewn, but a machine sewn stitch will be stronger.


And that is it!

Links to sites to purchase small looms and instructions, or find free patterns, etc.
  • Buxton Brook Looms – Basic instructions online and flip book: Modular Textures: Patterns for the Weavette® & Weave-it Looms with 30 patterns
  • Weavies – Weavies One book, 16 projects
  • eLoomaNation – Exploration of small looms, history, download PDF versions of old Weave-It booklets and user guides for different versions of the small looms
  • eLoomanator – Blog for the eLoomaNation site, ideas, patterns, and more.

Shorah Y'all!

Wednesday, March 12, 2008

Sante Fe Phone Cozy ...

I showed my first cozy to several co-workers and one said that she wanted one, so this evening I pulled some yarn out of my stash (I'm looking for projects to use up some of my stash) and made her a phone cozy. The yarn is a discontinued Lion Brand Jiffy (color: Sante Fe). When I was in Houston, Michael's had them at a large discount because they were being discontinued and I bought all they had.

Anyway, while making this cozy, I realized I'd made an error in my original pattern and was able to fix it. Hopefully, Amanda will love it (although I'm not that crazy about the beads I used but they were all I had). Hmmm ... may have used too much color correction on the photo ... ah well.


Shorah Y'all!

Tangled Thread Project #3 Errata

Oops ... update to strap instructions for cozy - see red text below.

For cell phone or mp3 player, ch 22 (or more if longer strap is needed), hdc in third ch from hook, ch 1, sk 1 ch, hdc in next ch (buttonhole made), hdc in each ch across, join with sc in sc on other side of stitch marker on the back side of the cozy (do not join in same st as marker).


Pattern post here and PDF file on Ravelry has been updated as well.

Shorah Y'all!

Tuesday, March 11, 2008

Tangled Thread Project #3

Yes, I know, I posted a project yesterday but I'd been wanting to make a phone cozy and since my internet connection at home was down, I pulled out some yarn that had been lying around for a while and started in on the project. The pattern is extremely easy and can be modified to make cozies for small game systems, like PSP and Nintendo DS, mp3 players, or even purses.


Accessory Cozy or Purse


Quick, seamless cozy for any accessory: cell phones, mp3 players, PSP or Nintendo DS system, or even a purse … just adjust the beginning chain to fit the accessory and start crocheting up! The cell phone cozy is just big enough to hold your phone, a credit/debit card, and a few dollars extra. Attach to your belt loop and head off for shopping or a day of fun at the boardwalk.

I wrote these instructions as I made the cell phone cozy so please let me know if anything needs correcting, especially for the game system cozy or purse.

Supplies:

Yarn: Lion Brand Wool-Ease Worsted Weight (version in pattern uses Autumn Print) or any other similar weight yarn; can also double up a thinner yarn. Variegated yarn works wonderfully with this design.
Buttons or Beads: Coordinating with yarn, large enough to hold strap and flap closed.

Crochet Hook: I/9 or hook to match selected yarn

Base:

For cell phone or mp3 player, ch 11 (more if item is wider, less if smaller) sc in second ch from hook and each ch across to end, sc 3 in first ch and continue around with a sc in each ch to last ch, 2 sc in last ch, join with sc in first sc. Mark as RS near last st of round.

For game systems, ch as many ch as needed to cover length of accessory, plus 1 ch, sc in second ch from hook and each ch across to end, sc 3 in first ch and continue around with a sc in each ch to last ch, 2 sc in last ch, join with sc in first sc. Continue around with sc in each sc and two sc in each of the three end sc. Join with sc in first sc. If base is wide enough to fit the end of the accessory with a bit of room to spare, continue to body, otherwise, do another round. Mark as RS near last st of round.

For a purse, decide on how high, wide, and long purse is to be. For beg ch, subtract an inch from the length and crochet a ch to that length. Sc in second ch from hook and each ch across to end, sc 3 in first ch and continue around with a sc in each ch to last ch, 2 sc in last ch, join with sc in first sc. Continue around with sc in each sc and two sc in each of the three end sc. Join with sc in first sc. Continue crocheting in the round until base is as wide as needed. Mark as RS near last st of round. Make a not of width of base as this will be needed for flap.

Note: As you add scs for body, the piece will start to curl up. If needed, flip the piece so that the RS stitch marker is outside the piece … or fasten off and provide a local faerie or your favorite house pixie with a sweet bed.

Body:

For cell phone, mp3 player, or game system, crochet in the round with sc in each sc around until body is long enough for the accessory to fit in comfortably with room to spare. Stop before the side of the cozy on the same side as the base stitch marker. Lay piece flat and mark st at each end.

For purse, continue until body reaches the needed height. Stop before the side of the purse on the same side as the base stitch marker. Lay piece flat and mark st at each end.

For a cell phone or mp3 player, if adding a strap, continue placing a sc in each sc until you reach the st before the first marker, sl st in that st (not in the one with the marker in it).

For a purse, if adding a strap, continue placing a sc in each sc until you reach the second st before the first marker, sl st in that st.

For all, if skipping the strap, continue placing sc in each sc until you reach the stitch marker, remove marker and sc in that st. Do not fasten off and skip to flap section.


Strap:

For cell phone or mp3 player, ch 22 (or more if longer strap is needed), hdc in third ch from hook, ch 1, sk 1 ch, hdc in next ch (buttonhole made), hdc in each ch across, join with sc in sc on other side of stitch marker on the back side of the cozy (do not join in same st as marker).
If not making a flap, sl st in same sc as marker and fasten off. Skip to bead/button section and add side bead/button only.

For purse or game system, decide how long strap needs to be and ch as many sts as needed for length. Attach with sc to second st before marker on other side, on front side of purse. Sl st in next sc before stitch marker, sc in same sc as stitch marker, hdc in first ch of strap and in each ch across. At end of strap, sc in same sc as stitch marker, sl st in sc after stitch marker (back side), sc in next sc, hdc in first hdc and in each hdc across. At end of strap, sc in second sc after stitch marker (back side).

Flap:

For cell phone or mp3 player, continue placing sc in each sc on back side of cozy across to second st before marker. Do not sc in st before marker. *Ch 1, turn, sc in each sc across to sc before strap*, ch 1, turn. Repeat from * to * four more times (6 rows).

*Ch 1, turn, decrease over next 2 scs, sc across to last 2 scs, decrease over last 2 sc*, ch 1, turn. Repeat from * to * until only 3 sts remain.

Ch 3, turn, skip middle sc, sc in last sc, ch 1, turn, 10 sc in loop, sl st in first sc of last row of three, fasten off. Button loop made. Weave in ends.

For purse or game system, continue placing sc in each sc on back side of purse to last sc before strap on other side. *Ch 1, turn, sc in each sc across to sc before other side of strap*, ch 1, turn. Repeat from * to * until flap is twice as long as the width of the base (you did remember to note
that down, right?).

*Ch 1, turn, decrease over next 2 scs, sc across to last 2 scs, decrease over last sc*, ch 1, turn. Repeat from * to * until only 5 sts remain.

Ch 5, turn, skip 3 sc, sc in last sc, ch 1, turn, 15-20 sc in loop depending on how many you like, sl st in first sc of last row of three, fasten off. Button loop made. Weave in ends.

Note: If loop for purse is too small or large for the selected bead or button, increase or decrease the ch for the loop and adjust how many scs in loop to match.


Buttons or Beads:

Attach a button or large bead at side of cozy/purse, opposite of where strap is attached. Fold flap over to front and mark where button/bead should be to go through loop. Attach the button or large bead at that location. See image below for example of placement.


Please do not distribute this pattern without permission, instead, send them here or to the pattern page at Ravelry. You may sell what you make using this pattern as long as it is not mass produced (i.e, a few items at a craft show are okay). If you'd like to sell more than a few items, please contact me. Making items for personal use or as gifts or donated to charities is not restricted at all.

Enjoy!


Shorah Y'all!

Monday, March 10, 2008

Tangled Thread Project #2

My second Tangled Thread project is a fun Watermelon Purse I designed for a class a few years back. I'd love to see what you folks do with it!


Watermelon Purse


Supplies:

Base and tie: Small amount of medium worsted weight green yarn.
Body: Green eyelash yarn, such as Lion Brand Fun Fur Lime, Crystal Yarns Fizz in Electric Lime or Grass Greens, etc.
Seeds: Lion Brand Fancy Fur, Firecracker Red or Party Pink
Top: Small amount of medium worsted weight pink or red yarn (select yarn color to match the Fancy Fur color selected)

Crochet Hook: I/9

Base:

With green yarn, ch 5, join with sl st, ch 2 (beginning hdc), hdc in same ch, 2 hdc in each ch around, join with hdc, hdc in same st. Continue placing 2 hdc in each st around until circle is 3.25-3.5” across. Fasten off.


Body:

Row 1: Join green eyelash yarn with sl st to last hdc on bottom piece. Ch 3 (beg hdc plus 1 ch), *hdc in next hdc, ch 1*, repeat from * to * around. Join with.sl st in top of second ch of beginning hdc.

Row 2: Ch 3 (beg hdc plus 1 ch), *hdc in next hdc, ch 1*, repeat from * to * around. Join with.sl st in second ch of beginning hdc.

Row 3: Sl st in first space, Ch 3, hdc in same space, ch 1, *hdc in next space, ch 1, hdc in same space, ch 1*, repeat from * to * around, join with sl st in second ch of beg hdc.

Rows 4: Ch 3, *hdc in next hdc, ch 1*, repeat from * to * around, join with sl st in second ch of beg hdc.

Row 5: Repeat row 4.

Row 6: Ch 4, *sc in next hdc, ch 4*, repeat from * to * around, join with sc in first sl st.

Row 7: Sl st in first space, ch 4, *sc in next space, ch 4*, repeat from * to * around, join with sc in first sl st.

Rows 8-10: Repeat row 7.

Row 11: Sl st in first space, ch 3 (beg hdc plus 1 ch), *hdc in next space, ch 1*, repeat from * to * around, join with sl st in second ch of beg hdc.

Row 12: Ch 2 (beg hdc), hdc in each space and hdc around, join with sl st in second ch of beg hdc.

Rows 13 & 14: Repeat row 12. Fasten off at end of row 14.

Seeds:

Row 15: Join pink or red Fancy Fur with sl st in any hdc. Ch 2 (beg hdc), hdc in each hdc around, join with sl st in second ch of beg hdc. Fasten off.

Top:

Row 16: Join pink or red ww yarn with sc in any hdc, sc in each hdc around.

Row 17: Ch 2 (beg hdc), hdc in each sc around, join with sl in sec ch of beg hdc.

Row 18: (Tie row) Ch 3 (beg dc), dc in next hdc, ch 1, *dc in next 2 hdc, ch 1*, repeat from * to * around. Fasten off.


Note: If you find that you have an extra or one too few hdc when ending this row, adjust the last set of dc by putting 2 dc in one hdc or skip two hdc instead of one at the end.

Tie:

Measure the circumference of the top of the purse. With green ww yarn, make a chain the length measured plus 12”. Fasten off.

Loop the chain through the top row of the purse, leaving about 3” of the end of the chain at the beginning. Halfway around, leave a 6” loop hanging out and continue threading the chain through. At the end, knot the ends together. To close the purse, hold both loops in one hand, wrap other hand around the loops and pull down.

Note: to make a stronger tie, make the chain with two strands of yarn.

Use the purse as is or add a simple lining.

Other fruit suggestions:

Strawberry: Use Lion Brand Fancy Fur Firecracker Red for the body & seeds section, with red ww for the base and top, and green for the tie.
Red Apple: Use a solid red eyelash yarn for body and seeds section, with red ww for the base and top, and green for the tie.
Green Apple: Use a solid green/lime eyelash yarn for body and seeds section, with green ww for the base and top, and green for the tie.

Or how about a blueberry or a lemon or ….

Please do not distribute this pattern without permission, instead, send them here or to the pattern page at Ravelry. You may sell what you make using this pattern as long as it is not mass produced (i.e, a few items at a craft show are okay). If you'd like to sell more than a few items, please contact me. Making items for personal use or as gifts or donated to charities is not restricted at all.

Enjoy!

Shorah Y'all!

Saturday, March 08, 2008

Finished ... one knitted wrist warmer

I'm a couple of days late with this but I finished the first wrist warmer on Thursday evening and started on the second one yesterday. The photos below show the finished wrist warmer. The first is before I sewed up the side and the second shows me modeling them. Not bad for a first finished knitted piece.


Shorah Y'all!

Tuesday, March 04, 2008

Irish Hiking Wrist Warmers

So ... yesterday, I frogged the dishcloth as it was too boring (I can't stand doing repeats of the same stitch for hours on end) and started making the Irish Hiking Wrist Warmers by Delia Rau (Ravelry Pattern Page). I picked this pattern because I'm obsessed with wrist warmers, I had the right weight yarn, and the knitting needles matched the only pair I've been able to find in all my boxes.

The photo below shows the first wrist warmer after I'd finished just over 2 repeats of the pattern. I'm hoping to finish the set within a couple of weeks, in between everything else that is. I'm using the yarn left over from making Britney's socks and it is so soft!


I have to stop browsing the patterns at Ravelry. I'm finding so many wonderful patterns that I'll never be able to make or wear. (sigh)

Shorah Y'all!

Saturday, March 01, 2008

Cris' Arm Warmers

I've almost finished the first arm warmer for Cris, just need to sew up the cuff and weave in the ends. I'm now starting on the second one and on a set for myself in a smaller yarn. Hopefully I'll remember to write down the pattern as I go this time!

The image below shows the full arm warmer:


And this one shows the detail on the back of the hand:


I'm quite pleased with myself at the moment.


Shorah Y'all!